
Solana is quickly becoming one of the most popular blockchain platforms for building decentralized applications thanks to its special features that support the development of custom smart contracts. This network stands out for its impressive speed, efficiency, and ability to scale, making it an attractive choice for businesses.
In this blog post, we’ll discuss the peculiarities of Solana and its architecture and cover the basics of developing smart contracts on it.
What is Solana?
Solana is a highly performant blockchain platform designed for decentralized applications and crypto projects. It is known for fast transaction speeds and low fees, making it suitable for a wide range of applications, including decentralized finance (DeFi), non-fungible tokens (NFTs), decentralized exchanges (DEXs), and more.
Scalability is a significant challenge for blockchain, particularly as networks grow and face limitations in transaction speed and confirmation time. Solana addresses these issues with an innovative verification approach. To verifiably record the timing of a transaction, it uses a mechanism called Proof-of-History that establishes a trustless system, reducing network overhead and increasing the speed of transaction processing.
Solana has its own native currency known as SOL. This currency, used to cover transaction fees, plays a crucial role within the network. SOL is also vital to the security infrastructure of the platform, where network validators stake SOL as a commitment, meaning that in return for their successful verification of blocks, these validators are rewarded with new SOL coins. On the flip side, if a validator misbehaves, their staked SOL could be slashed (i.e. partially removed from circulation); at the time of writing, automatic slashing is not yet implemented, with no immediate plans. However, the potential for slashing still discourages bad actors.
What are the key innovations of Solana?
Solana’s core innovation lies in its unique Proof-of-History (PoH) mechanism, which enables validators to rapidly reach consensus on the timing and order of transactions, thereby significantly increasing the network’s scalability and throughput. It is not the sole innovation driving Solana’s performance. The network employs other cutting-edge technologies in conjunction with PoH to reach its high throughput, low latency and ensure scalability of the platform.
Proof of History (PoH)
Proof of History (PoH) is a groundbreaking concept in blockchain technology, originating from Proof of Stake (PoS). Unlike conventional timestamp methods, PoH enables verifying that events occur in a specific order in relation to other events.
PoH utilizes a verifiable delay function (VDF) based on SHA256. The purpose of a VDF is to sequentially process hashes, using the previous hash as the input for the next one, at the highest possible speed. Thus, the term “verifiable delay” refers to the necessity for the computation to take a certain minimal amount of time. Although the initial computation requires some time, verifying the process can be efficiently parallelized, making the verification significantly faster.
Various events, like transactions, can be incorporated into the hash function input at any step of computing the VDF, thus establishing a clear, verifiable sequence of events. Since the hashing process takes a consistent amount of time, validators can accurately determine how much time has passed between transactions. Moreover, by arranging transactions in this hash chain, validators need to process and transmit less data for each block.
However, PoH has its limitations as well. They include:
- Complex setup: PoH is more complicated to implement than traditional methods.
- New and largely untested: Since PoH is relatively new, it hasn’t been tested over time as much as established methods, which raises concerns about possible unknown issues in the future.
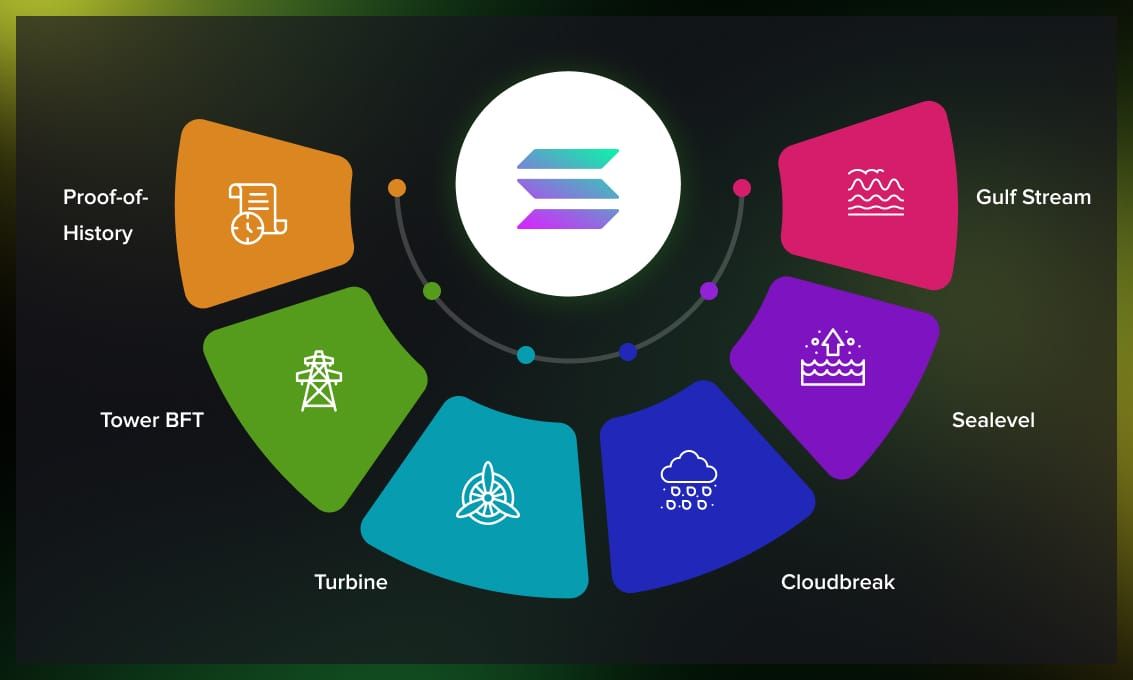
PoH itself only provides a verifiable event sequence, and Solana utilizes a set of other technologies to facilitate fast transaction processing. These include Tower BFT, Turbine, Gulf Stream, Sealevel, Cloudbreak.
Tower BFT (Byzantine Fault Tolerance)
Tower BFT is a consensus mechanism designed to increase network efficiency. Essentially, Tower BFT is a modified iteration of the Practical Byzantine Fault Tolerance (PBFT) model found in Delegated Proof of Stake (DPoS) blockchains. The main distinguishing features of Tower BFT are:
- PoH is used as a reliable network clock. Since PoH ledger has all network events with reliable timestamps attached, any node can compute the exact state of any other node without any additional peer-to-peer communication, which can significantly reduce network overhead. In contrast, traditional BFT systems rely on peer-to-peer communications between validators to establish a sequence of events.
- Validators are only allowed to vote once per slot. A slot is a number of PoH steps that represent a fixed amount of time, aimed to be around 400ms. This helps ensure the network makes consistent progress and doesn’t stall indefinitely.
- Tower BFT employs a stake-weighted timeout mechanism to incentivize validators to vote on the heaviest fork, which helps avoid chain forks. Micro-forks will still happen, but they are quickly discarded.
Turbine
Turbine is a block-propagation protocol that enables the network to increase node counts without increasing data transmission times. It works in a way that is somewhat similar to peer-to-peer data transmission protocols, such as BitTorrent. By breaking down messages into smaller packets and distributing them through a relay system among validators, Turbine significantly improves throughput and the overall capacity for processing transactions on the Solana network.
Gulf Stream
Gulf Stream enhances transaction processing by eliminating the traditional mempool, a holding area for transactions awaiting block inclusion. Transaction caching and forwarding is delegated to the edge of the network. New blocks at any given slot are produced by a single validator node called the leader. Leaders are rotated on a schedule to avoid giving one validator too much power. Every validator knows the order of upcoming leaders, making it possible to forward transactions to the expected leader ahead of time. This allows validators to execute transactions ahead of time and reduce confirmation times.
Cloudbreak
Cloudbreak is a horizontally-scalable storage solution for the state of the Solana blockchain. It uses a custom data structure that optimizes for parallel reads and writes and improves horizontal scaling. Its implementation is crucial for Solana’s scalability.
Essentially, Cloudbreak is a high-performance database that maps addresses to accounts.
Sealevel
Sealevel is Solana’s smart contract runtime. It is designed to allow for the parallel execution of smart contracts, which gives this platform a significant performance edge compared to other leading smart contract networks. Thanks to this feature, Solana can handle thousands of smart contracts running at the same time without compromising network performance.
One of the key aspects of Sealevel is the account model. It is important to understand it when writing Solana smart contracts or even simply using the blockchain. So we’ll discuss it in a bit more detail.
What is a Solana account?
The Solana account model is a fundamental aspect of its ecosystem, distinguishing it from other blockchain platforms.
Accounts on Solana serve as data storage locations. Unlike Ethereum, where a smart contract code and its data coexist in a conceptually single location, Solana makes a clear separation between a program’s code and data it is working on, assigning them to different accounts.
When a program is called, the caller must supply all the accounts the program will be working with, explicitly marking whether the account should be read-only, writable, or whether it’s signing the operation. This unique approach is one of the key factors allowing Sealevel to be highly parallel: indeed, the same program running on different accounts can be run in parallel using SIMD processing.
This approach also makes programs highly reusable and composable. For example, you don’t need to develop and deploy a separate smart contract to launch a memecoin on Solana; instead, you simply reuse the token program deployed by Solana Labs.
A Solana account stores its SOL balance, its owning program’s address, and a blob of arbitrary binary data, which is program-specific. There are some ground rules related to account ownership:
- Programs can’t change the data of accounts they don’t own.
- Programs can only debit SOL from accounts they own.
- Any program can read data or credit any account.
By default, new accounts are owned by the system program. System program facilitates various core blockchain operations, like transferring SOL between different accounts. It can also allocate zero-initialized data storage for accounts and transfer account ownership to other programs.
Types of accounts
The Solana blockchain has two types of accounts: executable and non-executable.
- Executable accounts are a special kind of account that is immutable, and contains byte-code that can be executed by the runtime. Historically, the executable code for Solana programs was stored within these executable accounts. However, due to their immutable nature, the necessity for upgradable contracts led to a more complex approach. Nowadays, executable accounts only store a small loader shim, while the actual code is stored in a separate account which is not marked executable. Executable accounts are owned by the BPF loader program version 1 or 2, or the BPF upgradable loader program. All new programs are owned by the latter.
- Non-executable accounts are used for program-specific data storage, and their data is mutable.
Maintaining data in these accounts incurs costs known as rent, payable in lamports — a fraction of Solana’s native token, SOL, used for micropayments on the network. Rent fees depend on the storage size needed by an account, with larger data storage incurring higher fees. Currently, all accounts must be rent-exempt, which means they are required to maintain a minimum SOL balance at all times. This minimum balance varies depending on the amount of data the account stores. At the time of writing, for an account storing the absolute minimum of 128 bytes, the required minimum balance is 0.00089088 SOL, or equivalently, 890,880 lamports. You can easily compute the rent-exempt balance by running solana rent <size>, where <size> is the size of the account in bytes. Bear in mind that solana rent adds the 128 byte minimum to the argument, as those bytes are not usable for program-specific storage. Hence, solana rent 5 actually gives the balance for 133 bytes (i.e. 128 + 5).
What are SPL tokens?
SPL tokens are digital assets that operate within the Solana blockchain ecosystem. The code governing SPL tokens is deployed by Solana Labs as part of the Solana Program Library. In a stark contrast to Ethereum, for instance, where each token must have its own contract, tokens on Solana reuse already existing contracts.
The fees for transactions involving SPL tokens are payable in SOL, the platform’s native coin.
Features of SPL tokens
SPL tokens are different from the token standards found in other blockchain ecosystems, such as Ethereum’s ERC standards, TRON’s TRC-20, and Binance Smart Chain’s BEP-20. The key characteristics of SPL tokens include:
- Suitability for NFTs and fungible tokens: SPL tokens cover both fungible (interchangeable) and non-fungible (unique) tokens under a single standard. (Ethereum, for instance, has separate standards for each token type.)
- Composability: Token code can be reused, facilitating the creation of new SPL tokens with minimal changes. This composability means that developers can efficiently produce new tokens by altering a few parameters.
- Efficiency: SPL tokens benefit directly from the high-performance nature of the Solana blockchain. The network’s high processing speeds enhance the transactional efficiency of SPL tokens, making operations with these tokens faster and more cost-effective compared to those on other blockchains.
What is Token-2022?
Solana’s Token-2022 program, also known as Token Extensions, represents a new implementation. It is backward-compatible with the original SPL Token to a certain extent. However, it is a distinct program, featuring separate source code and deployed at a different address.
Token extensions have broadened the scope of minting and spending for SPL tokens, enabling users to employ SPL tokens in a wider array of applications such as confidential transactions, innovative compliance mechanisms, introduction of fees on token transfers, and more. Token extensions are compatible with both fungible and non-fungible tokens.
Although the program was introduced in 2022, beta testing was only recently completed, opening up opportunities for smart contract development. However, the program still remains upgradable at the time of writing, with further changes and a tentative plan to freeze updates later in 2024.
Token-2022 extensions fall into two categories: mint and account extensions.
Mint extensions
Mint extensions enhance the capabilities of a token mint, an account owned by the SPL Token program (2022), which stores the necessary metadata about the token, such as who can mint new tokens, whether the token is divisible, and to what extent, etc. Mint extensions allow for specifying additional rules or attributes for the token, for example, adding user-facing metadata, such as a token name and picture.
They are useful when the token requires additional logic or information beyond the standard issuance, such as defining unique identifiers for NFTs or embedding regulatory compliance checks.
The current mint extensions include:
- Confidential transfers: These allow for private transactions between users, keeping the transfer amounts hidden. Note that at the time of writing, confidential transfers still require feature activation on the network, and thus do not yet work.
- Transfer fees: This feature enables the collection of fees with each token transfer, which are then allocated to a specified account. This is useful, e.g., for implementing royalties on NFT sales.
- Mint close authority: This extension grants owners the power to close mint accounts, enabling them to recover the lamports within these accounts.
- Interest-bearing tokens: This is a cosmetic feature that allows for specifying how token amount should be adjusted before being displayed. Specifically, it allows specifying the interest rate at which the visible token amount will grow (or decrease). No new tokens are actually minted.
- Non-transferable tokens: This feature restricts the transfer of tokens between users, locking the tokens to their initial holder.
- Permanent delegate: This function designates a permanent delegate for a mint, granting this delegate unlimited access and control over any token account associated with that mint. This includes the ability to transfer or burn tokens at will. Use cases for this might include the confiscation of assets from a sanctioned entity or reclaiming a token subjected to an unpaid Harberger Tax.
- Transfer hook: When enabled, each token transfer will trigger a specified program via CPI (cross program invocation), making it possible to run custom on-chain code on token transfers, for example, blocking some transfers using program-defined logic.
- Metadata pointer: Enables token creators to appoint an address that holds the official metadata for the token. Interestingly, this can also refer to the mint itself.
- Metadata: This extension integrates additional metadata directly into the token mint account via custom fields. It should be noted that, at the time of writing, DEX and wallet support for native Token 2022 metadata is quite lacking, so Metaplex Token Metadata should still be preferred for the time being.
- Group pointer: Token creators can point to a group account that provides details about the mint. This is similar to metadata pointer, but describes how tokens are grouped together. For example, this is useful for Collection NFTs.
- Group: As with metadata, the mint itself may be set up to be its own group account. The same caveat applies: ecosystem support at the time of writing is lacking, so the previously mentioned Metaplex Metadata should be preferred.
- Member pointer: This extension is similar to Metadata and Group pointers, but here the pointed-to account describes group membership.
- Member: Similar to Group and Metadata, the mint itself can be its own member description. The same caveats apply as with Group and Metadata.
Account extensions
Account extensions are used to add functionality or data to token accounts, which are the individual holdings/accounts containing specific amounts of tokens. These extensions can provide additional features to the accounts, such as enabling account-specific settings, restrictions, or capabilities.
Account extensions are particularly useful for creating more sophisticated token holding structures, such as escrow accounts with conditional releases, accounts with multi-level access controls, or enhancing user experience with customized metadata.
The current account extensions are:
- Memo requirement for transfers: This extension requires the inclusion of a memo (i.e. a plaintext note) with every token transfer to ensure regulatory compliance, reporting, and more thorough audit trails.
- Permanent ownership: Ensures the ownership of a token account cannot be transferred, thereby making the owner immutable. This precludes certain attack vectors that are possible with associated token accounts.
- Default account state: All new token accounts are created in a “frozen” state, requiring some form of interaction with the associated project for “unfreezing” and enabling the use of the accounts or tokens.
- Cross-program invocation guard: This setting precludes certain CPI (cross-program invocations) with the token account in question. This is potentially more secure, as it prevents programs from running operations with user’s authority in a way invisible to the user.
- Reallocation capability: This feature allows owners to adjust the allocation of their token accounts after they have been created, to allow for additional extensions.
Watch this official video by Solana discussing some uses cases for token extensions:
You can also find the developer’s guide for token extensions at the Solana official website.
What is the right programming language for Solana smart contract development?
The choice of a programming language for developing a smart contract for Solana is extremely important. Although Solana supports several languages (for example, C and C++), the preferred option is Rust, which stands out for its emphasis on memory safety.
Rust helps the early identification of memory-related errors, such as buffer overflows and null pointer dereferences. This feature significantly enhances the security and robustness of smart contracts, making them more resilient to attacks.
Rust also benefits from strong tooling and a supportive community for Solana development. Solana program development in Rust is much more mature, with numerous first-party tooling and libraries specifically for Rust.
How to build a smart contract on Solana?
Smart contracts for Solana are developed using the tools provided by the platform’s ecosystem. In this section, we give a detailed breakdown of the process.
Step 1. Setting up the development environment
To set up the development environment involves the following actions.
- Install CLI: The Solana Command-Line Interface (CLI) tool suite is essential for deploying smart contracts, as well as managing and interacting with them on the Solana network. You can find installation guidelines for your operating system on the Solana documentation website.
- Download and Install Rust: Download Rust from its official website, then follow the operating system-specific setup instructions. Utilize Rustup, a versatile tool that simplifies installing Rust, its package manager Cargo, and other essential dependencies needed for Solana development.
- Create a Solana wallet: This tool is essential for interacting with the Solana network, from signing transactions to deploying smart contracts. You can create a wallet through the Solana CLI or a web-based solution such as Phantom, Solflare or Backpack. Remember to secure your wallet’s seed phrase, as losing it will lead to losing access to your wallet. Important note: You’ll need to export wallet keys into the CLI to deploy programs, unless you’re using a hardware wallet. So, if you have a Solana wallet containing assets, it’s best to avoid using it for deploying programs due to security risks. Instead, create a separate account specifically for deploying programs and fund it with SOL as necessary.
- Configure the development setup: With all necessary tools in place and your wallet set up, the final step is to tailor your development environment for the Solana network. This involves connecting the Solana CLI to the appropriate Solana cluster and linking your wallet’s address. The Solana documentation provides detailed instructions for this configuration process.
Step 2. Writing a smart contract code for Solana
After setting up your development environment, the next step in creating a smart contract on Solana is to write the code.
There are a few ways to approach this:
- The so-called native Solana programs are simply library crates written in Rust, using the
solana_programcrate for calling Solana’s APIs. - The Anchor framework is specifically built for Solana smart contract development. Anchor is mainly intended for Rust, but it also has support for Solidity using the solang compiler.
- The Seahorse framework allows writing Solana programs using Python syntax. Seahorse is built on top of Anchor, and works by translating Python code into the equivalent Rust code under the hood, so it has mostly the same features as Anchor.
Each of these options has their strengths and weaknesses.
Native programs give the developer the most control over how the program will execute, but on the flip side, it’s entirely the responsibility of the developer to check and uphold invariants to avoid security issues. One particular strong point of native programs is the availability of the full scope of Rust tooling for unit and integration testing.
Anchor simplifies the development by taking care of a lot of boilerplate, including checking common invariants, so the programmer can focus on business logic. On the flip side, it allows less control, and binary artifacts produced using Anchor tend to be larger (thus deploying them costs more in rent). Anchor primarily uses JavaScript for testing programs, essentially running an isolated instance of the blockchain on the local machine, deploying the program, and running transactions against it. While this approach is simpler in some important ways, it is limited to integration testing, and it can be comparatively slow. The latter issue can be addressed with the Bankrun testing framework, but it’s not integrated with Anchor.
Seahorse goes a step further, and hides some Rust idiosyncrasies from the developer behind a less complex Python-like syntax. This, however, comes at the cost of flexibility. Additionally, at the time of writing, Seahorse is still in beta, so extra care should be taken when using it in production.
Developing a native program
- Create a library crate with cargo: Native programs are just library crates, so to start with, use
cargo init <crate_name> --libto create a new crate. - Add solana-program to dependencies: In the root directory of the crate, run
cargo add solana-program. This will add the on-chain program SDK as a dependency. - Set the required Cargo options: Open
Cargo.tomland addcrate-type = ["cdylib", "lib"]to thelibsection. - Define the entrypoint function: Solana needs to know where to start executing the program, the function where it starts is called entrypoint. It must have the following signature:
pub fn entrypoint(
    program_id: &Pubkey,
    accounts: &[AccountInfo],
    instruction_data: &[u8]
) -> ProgramResult
- Export the entrypoint function: To tell the runtime where the entrypoint function is, use the
solana_program::entrypointmacro, e.g.solana_program::entrypoint!(entrypoint) - Write the business logic: The raw instruction data is passed to the entrypoint. The developer is then responsible for decoding this data and taking appropriate actions. The encoding format is not specified by the network, so it’s arbitrary. However, Borsh de-/serializer is the recommended option, and utilities for working with it are exported from
solana_program::borsh*modules. - Write and run tests: Define regular Rust unit tests, and/or use
solana-program-testfor integration testing. - Build the program: The CLI tool suite mentioned previously comes with
cargo-build-bpf, which can build a binary artifact suitable for deployment. Run it either directly or via Cargo ascargo build-bpf. It will automatically download the toolchain if needed and build the binary artifact, putting it into thetarget/deploy/directory.
Developing an Anchor program in Rust
- Install Anchor: Since Anchor is not a core part of Solana, it needs to be installed separately. Go to the official documentation for instructions.
- Create a new Anchor project: Use
anchor init <your-project-name> - Define data structures for accounts: Annotate data structures with
#[account]to let Anchor know it should derive account-related boilerplate for the structure. - Define account lists for instructions: By annotating a data structure with
#[derive(Accounts)]and its individual fields with#[account(...)], you can specify what accounts an instruction expects, whether they’re mutable, any additional constraints to be checked, etc. Anchor will take care of the boring boilerplate of actually marshaling the accounts and checking constraints. - Define program instructions as functions: Anchor automatically takes care of instruction de-/serialization. To define instructions and their business logic in Anchor, define a new module, annotated with
#[program]. Public functions defined in that module will have corresponding instructions. Each function must take two arguments: aContext <Descriptor>, whereDescriptoris a struct with#[derive(Accounts)]annotation (defined previously), and an arbitrary type representing instruction data payload. This instruction payload type must implementAnchorDeserializetrait (which can be derived). In most cases, it should also implement theAnchorSerializetrait (also can be derived). The function should returnResult<()>. - Define errors: Anchor allows defining custom errors with user-facing messages. Define an enum, annotating it with
#[error_code], and annotate each variant with#[msg("Error description here")](where the error description describes the error). Then use these errors in the program’s business logic by wrapping them with theerr!macro, or write assertions using therequire!Macro. - Write tests: Anchor uses TypeScript to define integration tests using Solana TypeScript SDK.
- Build the program using
anchor build. - Run tests using
anchor test.
Step 3. Testing a Solana smart contract
Testing the functionality and efficiency of your smart contract is an essential of Solana development. Solana provides a range of testing tools and environments designed to ensure your code works correctly and integrates within the Solana ecosystem.
- Unit testing: Rust’s integrated unit testing framework is a first line of defense, allowing you to check individual code segments in isolation and facilitating local testing on your development machine. When using Anchor, writing unit tests is notably more challenging, as the framework itself only offers “external” integration testing using the Solana TypeScript client SDK.
- Integration testing: Integration testing evaluates your smart contract’s interactions with other Solana network components. There are two main approaches to integration testing: solana-program-test, which is a Rust crate that offers an emulated Solana network environment for integration testing, and solana-test-validator, which runs a local Solana node for testing smart contracts more or less “in situ.” The latter is significantly slower and more awkward to work with, but it behaves almost like a real network. Anchor uses the latter to run tests, but using the Bankrun testing framework can be another viable option for testing Anchor programs.
Step 4. Deployment of a Solana smart contract
After testing the Solana smart contract code, the next step is the deployment to the Solana network. Here’s how to do it:
- Deploy the program: Your smart contract’s unique identifier on the network is the Program ID. To create one, use the Solana Command Line Interface (CLI) by executing the following command in your terminal:
solana program deploy <path_to_your_compiled_program>. This action compiles and uploads your smart contract to the network, assigning it a Program ID for future reference and interaction. If you want a vanity address for your program, you can generate it ahead of time (e.g. withsolana-keygen) and supply it tosolana program deployusing the--keypairargument. By default, you’ll get a random address. When using Anchor, you can useanchor deploy. You can supply a vanity address by placing its key into./target/deploy/<program_name>-keypair.json. - Verify the deployment: Confirm that your smart contract is correctly deployed by checking its Program ID on the network. You can use the Solana Explorer, Solscan.io, another public indexer, or the Solana CLI command
solana program show <program_id>to retrieve detailed information about your contract, including its size and its SOL balance. This step ensures that your smart contract is active and ready for use on the network.
If you are having difficulties in your development process or if you need a third-party audit of your Solana smart contract, we are here to help.
FAQ
Is it possible to integrate Solana smart contracts with other blockchain platforms?
Not directly, but you can set up asset bridges, which is true for any blockchain pair that support smart contracts.
Which programming languages are suitable for developing Solana smart contracts?
You can create Solana smart contracts primarily with Rust, but other languages such as C, C++, Solidity (via Solang compiler) and Python (via Seahorse framework) are also suitable.
How do I test Solana smart contracts?
For native contracts, you can use Rust’s testing facilities, plus solana-program-test for integration testing. Anchor framework provides its own set-up for integration testing based on solana-test-validator. Finally, any program can be tested using Bankrun, a NodeJS test harness using solana-program-test under the hood.
What does the Solana Explorer do?
The Solana Explorer is an online tool that allows users to visually navigate the Solana blockchain, view transactions, and examine smart contracts in detail.
Conclusion
In summary, Solana offers an attractive alternative to older blockchain platforms like Ethereum. Thanks to its architecture, it offers high speed of transactions, low latency, and scalability. Its Token-2022 program, representing a set of extensions for building custom smart contracts, caters to the new business environment and demands of the present and future. Solana’s market position is also very strong and set to maintain and enhance its influence.
If you’re aiming to unlock the full potential of your blockchain projects and are in search of a skilled and experienced Solana smart contract developer, the team at Serokell is ready to assist.


.jpg)